I’ve thought about doing a full tutorial on how to use Microsoft Word’s “Track Changes” capability. And maybe eventually I’ll do a fuller post on that, but there are lots of other good tutorials out there. Also I don’t want to delve into the can of worms that is Microsoft Word screenshot copyright.[1] So I’d like to focus instead on just a very basic primer on how to use Track Changes, as well as talk about why I like it for editing.
First, a screenshot I know is safe to use. You might be amused by this random story beginning I wrote when I was 17:
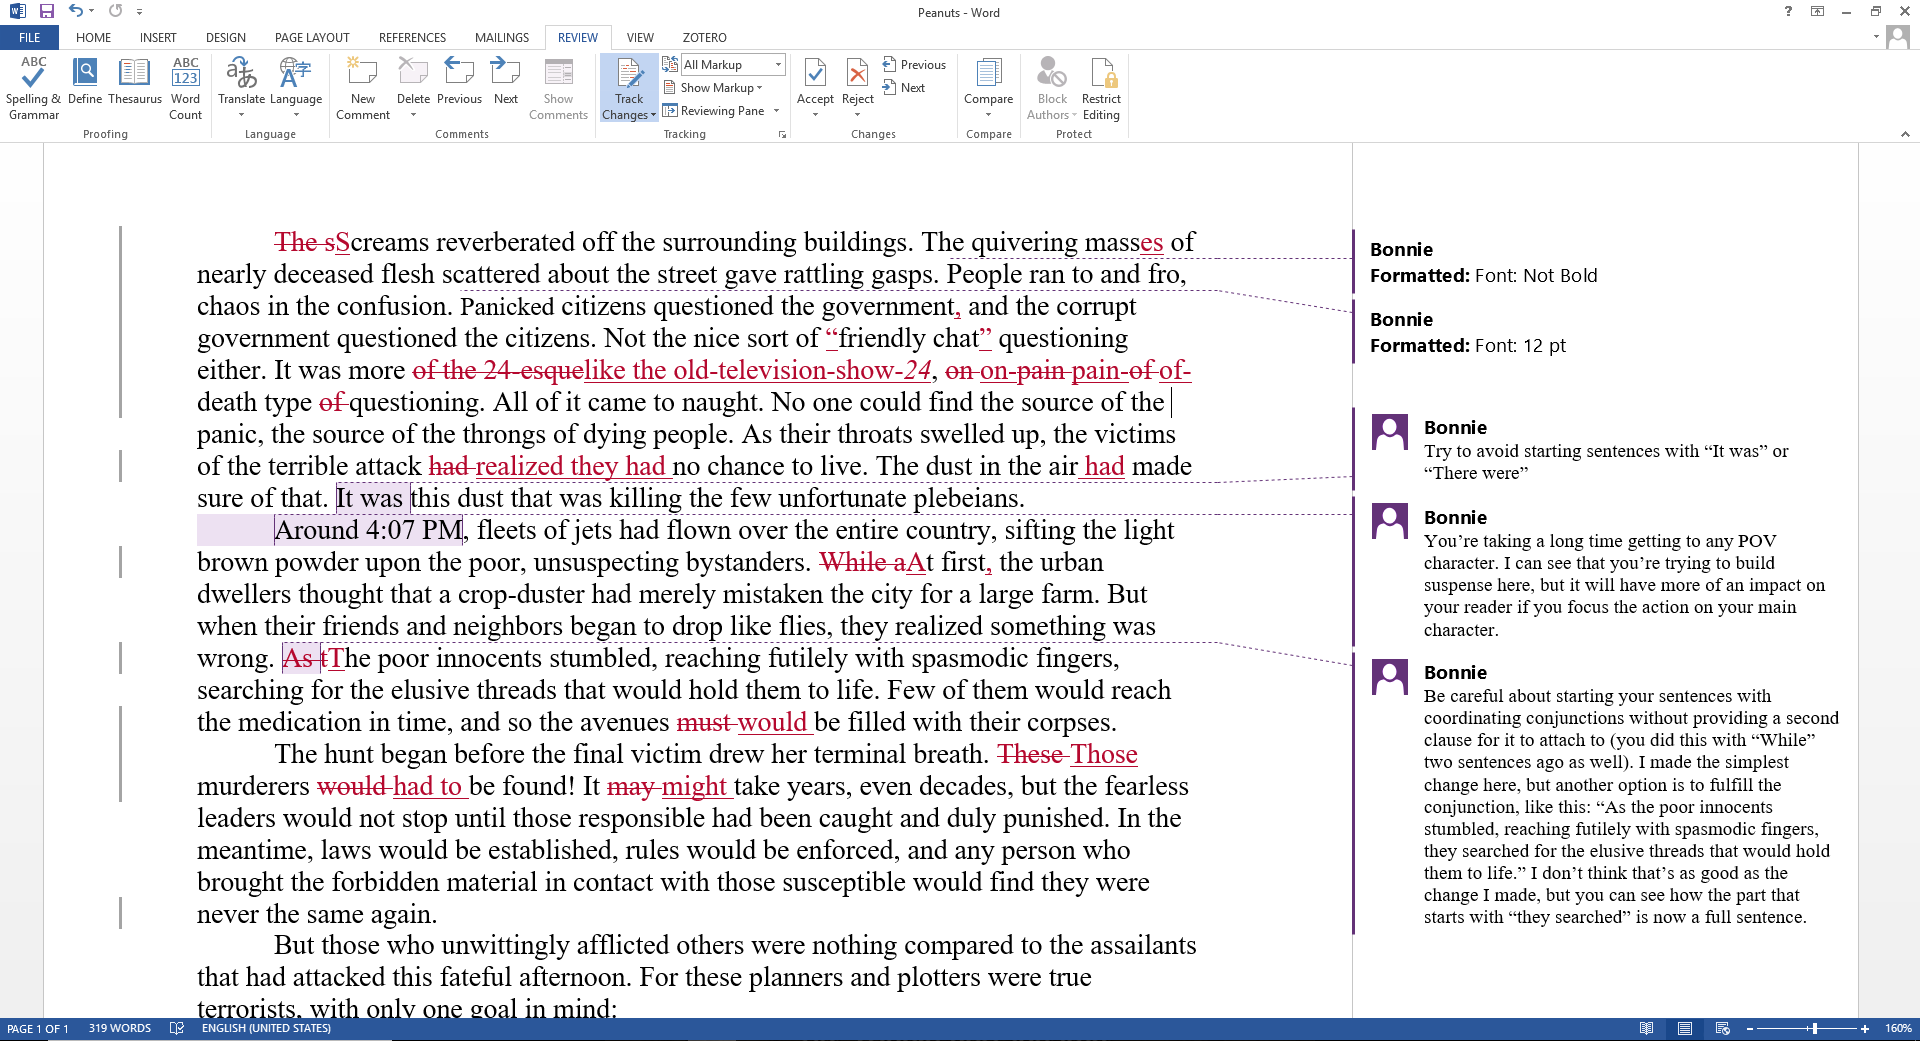
I’ll refer back to this to show how to use different parts of Track Changes. Sadly, I prefer the aesthetics of good old Word 2007, but I suppose you never can go home again.
How to Use Track Changes
If Track Changes is old hat to you, feel free to skip these two sections 🙂 To turn on Track Changes, go to the Review tab at the top of the screen. You’ll see in my example the blue box around the little “Track Changes” icon. That means that Track Changes is on and every change you make in the document will be highlighted. You can see the red words throughout—these are all changes I implemented. The words and punctuation marks that have a strikethrough are those I deleted, and the underlined words are ones I added.
Some changes are hard to see (like a deleted comma) or don’t appear in red at all: for example, see the formatting change I inserted in the second line. Luckily, formatting changes are highlighted by comments in the right-hand margin. But Word also provides another clue that something in a line has been changed. The vertical black lines floating in the left column indicate a change somewhere in the adjacent line. My first entirely un-changed line is the 7th, and you’ll see the gap in the line to the left. This is important to remember when you’re scanning through your document after having (you think) dealt with all of the changes. If you see a black bar anywhere, you know you’ve left something unchanged.
The other thing you’ll notice is the comments in the right-hand margin. As I was editing, I highlighted a portion of the text, clicked on “New Comment” in the toolbar at the top of the page, and my little comment bubble popped up. I use these comments to make suggestions, particularly on more big-picture items, or when I notice an author making the same mistake over and over again (as past-Bonnie did with not finishing the sentences that started with the conjunctions “As” and “While”).
Accepting or Rejecting Changes
Throughout the revision process, you’ll generally find two options for making the same change—clicking on an icon in the toolbar, or right-clicking the suggestion and choosing the same option from a drop-down menu. This is true both of comments and in-text changes.
Comments are easy to delete: you can either highlight the comment and click on the “Delete Comment” icon in the toolbar, or you can right click on the comment and choose the delete option from the drop-down menu. Generally, I recommend that you don’t delete a comment until you have made all the revisions the comment inspired you to make. If you have a question, you can leave the comment and reply with a comment of your own. The easiest way to do this is to click on “New Comment” while you have the original comment selected. Or, again, you can right-click on the comment and choose “Reply to Comment” from the drop-down menu.
As for the in-text changes, you can again mouse over any individual change, right click on it, and then click “Accept” or “Reject.” A faster way to deal with changes, if you’re going through a document full of them, is to use the buttons in the toolbar. You can see the “Accept” and “Reject” buttons. By default, when you click one of these, it accepts or rejects the highlighted change and immediately jumps to highlight the next change in the document. This makes it easy to deal with everything in quick succession. The little “Previous” and “Next” buttons allow you to easily navigate between changes without actually doing anything to them.
Now, you’ll see the little black triangles under “Accept” and “Reject.” If you click on one of those, you will find further options for what will happen when you click. You can just accept or reject the change without moving on to the next change, and you have options to accept or reject all changes in a document. Be careful with those! You can undo it with ctrl+z (undo), but if you accept or reject all and then quit the program, you’re stuck with the changes.
Why I Like Track Changes
I like Track Changes because it clearly highlights what I have changed. I can safely make in-text suggestions while still leaving final decisions to the author. As a content editor, my job is to make suggestions. But ultimately, it is still the author’s book. They need to make sure that what I’ve suggested fits their voice and theme for the book. I never expect an author to accept all of my changes. That’s why I’m so leery of the “accept all” option.
Above all, I always hope that an author will be able to improve upon my suggestions. This is why I also like the comment feature. Sometimes it’s easier to make changes directly in the text. But sometimes a change encompasses more than a sentence or two. When I find an often-repeated error or area of improvement, I will write up a comment. Or when I have suggestions for character or plot development, those will often go in a comment. And I use comments to ask A LOT of questions.
Part of my job as editor is to provide the author a sense of how a reader will react to a book. If there’s something that will pull the reader out of the book, I want to let the author know. Because, unlike with me, the reader can’t turn to the author and ask “but wait, weren’t they just in a city? Why is he tripping over trees now?” So I ask in a comment, and the author can then make sure the answer is in the text.
Track Changes helps me accomplish all this and more. I’ve also had it prove useful in reverse—sometimes an author is unsure of their corrections to a scene and will turn on track changes so I can see what they did and let them know if they’re on the right course.
Using Microsoft Word Track Changes for editing is an industry standard. And it’s just plain useful. I encourage all writers to make use of it.
[1] Their website says you can use screenshots for tutorials and websites and the like, but one of their restrictions is you can’t use “portions of screenshots”. Meaning presumably you can’t crop your screenshot to just show the relevant button or highlighted text? But every other tutorial I’ve seen uses cropped screenshots. So maybe they got permission or I don’t understand what they mean by “portions”… A problem for another day.